There are lots of ways to make coffee at home, and each of them will give you a different result. That’s part of why making coffee is so great––you can try all kinds of different brewing techniques and devices to find the one that’s right to you.
Pour over coffee is ideal if you’re after a lighter, brighter cup of coffee. But if you want something with more body and mouthfeel to it, you’re better off with immersion brewing.
In pour over brewing, the water passes through the coffee for a short amount of time. But in immersion brewing, the coffee sits in the water for a longer period of time, which produces more oils in the final cup.
The result with immersion brewing is full-bodied, oily, and thick coffee.
If that sounds like your ideal cup of joe, then immersion brewing is the method of choice for you.
What You Need for Immersion Brewing Coffee
You don’t need much to start making coffee at home using immersion techniques. There are a few main immersion devices we recommend:
The Bodum Brazil French press is one of the most highly regarded French presses. If you like a classic, full-bodied, robust cup of coffee, you’ll love the French press.
Since the French press uses only a metal filter, you’ll likely have some silt in your cup, which makes the last few sips a bit gritty. However, it’s the best device for making powerful coffee.
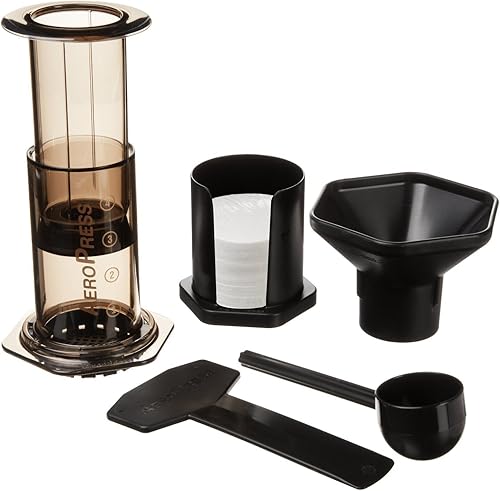
After something a bit more complex? The Aeropress is a good choice. While it looks intimidating with all of its pieces, it’s surprisingly straightforward, and there are hundreds of methods for using it.
The Aeropress uses a paper or metal filter, so you can tweak the taste depending on what you like. The paper filter will produce a smoother cup, while the metal filter will retain many of the oils and give you a more full-bodied cup.
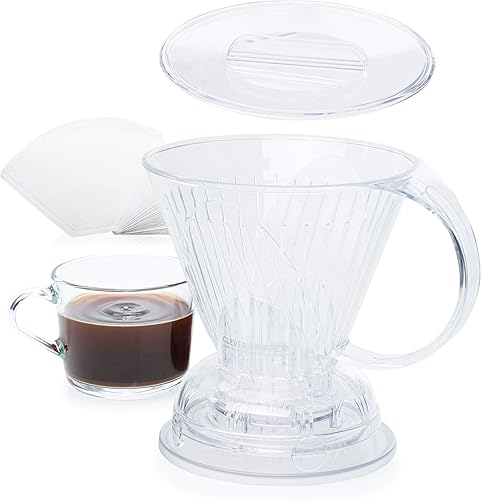
Last but not least, the Clever coffee dripper is a hybrid dripper and immersion device. The coffee and water mix together in the dripper, which is closed at the bottom.
When you place the Clever onto a mug, a hole opens in the bottom and releases the coffee right into your cup.
The Clever uses paper filters, so it gives you a considerably smoother taste than the French press or Aeropress will.
Keep in mind that the Aeropress and Clever are both plastic, so if you’re worried about plastic leeching toxins, we recommend the Bodum Brazil French press.
Once you’ve gotten your gear, it’s time to brew!
Recipes
First, you might be wondering what kinds of coffee you should use. While there are no right or wrong answers, different immersion devices respond differently to various single origin beans.
French presses typically excel with Brazilian or Southeast Asian beans (like Sumatran or Indonesian coffees).
The Aeropress works well with almost any origin, but if you’re stuck, we recommend trying a Colombian or an Ethiopian.
We’re going to give you recipes for two of the most popular immersion devices: the French press and Aeropress.
While there are countless methods, these are good starting points, especially if you’re new to immersion brewing.
French Press Coffee Recipe
This recipe is for the 3-cup French press. If you’re using a larger French press, you can adjust the ratio to fit your needs. For example, if you’re using an 8-cup French press, you’ll want about 54 grams of coffee and about 860 grams of water.
1. Grind 18 grams of coffee beans to a size that’s a little bigger than a coarse grind.
2. Bring 300 grams of water to a boil.
3. Once the water is boiling, add the coffee to the French press, and pour all of the water in. (Make sure it doesn’t overflow, though!)
4. Give the slurry a slow, thorough stir or two. We recommend using a bamboo stirring stick so you don’t break your press. Place the lid on the press, but don’t plunge just yet.
5. After about a minute (or whenever you see a crust forming on the top), give the slurry another stir, making sure all of the coffee is submerged in water. Secure the lid again (but don’t plunge yet).
6. After 4 minutes, gently plunge the coffee. Slow and steady wins the race here. The plunge should take about 15-25 seconds to complete. (If it’s too hard to press down, you need to use a coarser grind; if the plunger seems to sink down without much pressure, use a finer grind.)
7. Once everything is pressed, decant the coffee immediately, and enjoy!
Aeropress Coffee Recipe
In our opinion, the best Aeropress recipe comes from Shuichi Sasaki, the winner of the 2014 World Aeropress Championship. (Yes, that’s a thing.)
However, since Shuichi was using competition-grade equipment, we’ve modified his recipe so anyone can follow along.
1. Grind 16.5 grams of coffee to a medium grind.
2. Heat your water to 172ºF. While the water is heating, place a paper filter in the filter cap, and rinse it with hot water. Screw the cap onto the Aeropress. (Pro tip: Wet the plunger end of the Aeropress.)
3. Once the water has reached 172º F, dump the coffee into the Aeropress chamber, and pour 40g of water in.
4. Stir 5 times, and let the coffee bloom for 25 seconds.
5. Add 210 grams of water, and stir the slurry once.
6. Insert the plunger into the chamber, and slowly plunge. This should be at a snail’s pace, taking about 1 minute and 15 seconds.
7. Stop plunging when about 45 grams of coffee is still left in the Aeropress. The coffee level in the Aeropress should be a little below the 1 marking on the side of the chamber.
You can watch Shuichi brew this recipe here:
Final Thoughts
Immersion brewing offers a stronger alternative to the popular pour over method. If you like thick, robust cups of coffee, them you’ll be delighted with immersion methods.
The French press and Aeropress are quite different, even though they may seem similar at first. There are countless recipes for both, and we recommend searching for new recipes regularly.
The recipes we’ve provided will start you off, but don’t let your journey end there.
Even if immersion brewing coffee sounds perfect, we recommend also trying pour over coffee methods. You might eventually have both pour over and immersion devices in your coffee setup!
image: Pixy


